Happy birthday to my Dad and Friday Fancies

*Today is the final day to enter my giveaway that was posted on Monday, be sure to enter you don't want to miss out on the lovely photography by Stesha!
I am up here enjoying Oregon (last minute trip) with my Sean and his team, and so lucky I get to visit another state. I cant wait to do a trip recap for you, and everyone who lives up here is extremely blessed! Those who haven't ever visited, get it on your list of must-see places!
Ok before I give a shout-out to my Dad, here is something about my family, Sean and I and his parents. On January 6 is my mom's birthday, on January 9 is my mother in law's birthday, and on January 10 is my birthday. On September 23 is Sean's birthday, yesterday was my father in law's birthday and today is my dad's birthday. How crazy is that! Was it a sign that Sean and I were meant to be together, who knows but I tell you it is super easy when I have to buy birthday cards!

I want to give a special shout-out to my dad on his birthday today. Thank you Dad for always being there for his family, for providing for us and making sure we stayed on the straight and narrow. Even when I complained I didn't need or want to take 4 years of math and science in high school, you still demanded we do. You made sure education was a priority, you showed us your family was a priority and I am thankful for all the 24 years you served in the Air Force, you were there for each of our births and never had a solo tour, we were always with you wherever you went. Thank you for being the advice I go to when I am unsure about my schooling or career path, thank you for being the rock that stays strong. You were the humor in our family that always kept us laughing and keeping things light. I love you! 
Here is my wonderful Dad.


My dad and mom


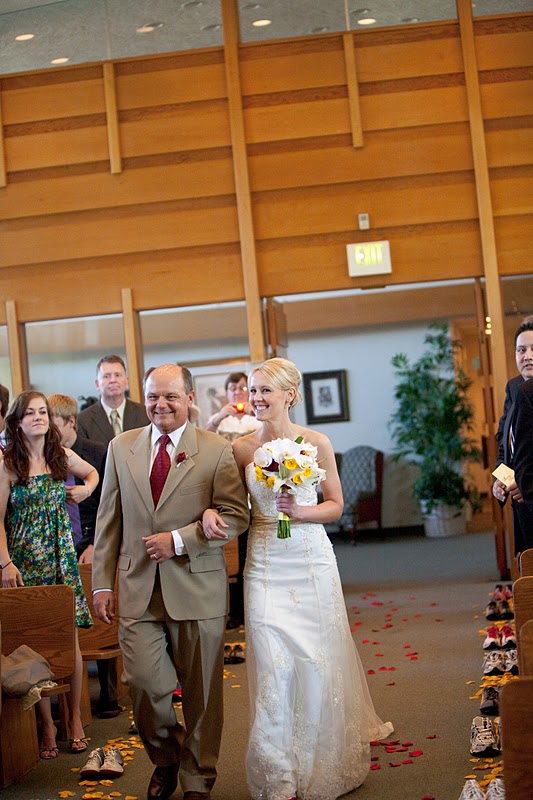
I remember at the end of this walk, you whispered into Sean's ear, take good care of her. Thank you for always being there for me. 

Finally, today is Friday Fancies posted over at Long Distance Loving and who didn't love this week's topic of boots. You can do boots during the fall, the winter, when it rains or when you just want to be cute. I didn't go with the fall trend, I was actually suppose to attend the rodeo tomorrow but since I am up here in Oregon, I can't anymore so my outfit reflects what is on my mind, the rodeo followed by line dancing. Wish I could be there!


And I love my personalized Friday Fancies sign created by Alison as well, that girl has some talent to boot, sorry couldn't resist ;-)

cowgirl it up


Get in my belly! Recipe Thursday

*Tomorrow is the last day to enter my giveaway for a set of 3 cards that feature Stesha's photography,
be sure to enter!
Happy birthday to my father-in-law, John, hope you have a wonderful birthday!
I have a present for you all today, I have two recipes to share for your delight! Not just a weekly dessert for you but also a delicious, yummy, not fried, contains no MSGs Chinese dish. The name of this dish is oyster sauce beef with vegetables, and of course I serve it over rice, but be sure never to stick your chopsticks into the rice bowl, it is a symbol of someone dying in Japan, remember that next time you stick your chopsticks in your rice bowl. Onto the recipe!

There are two sauces for this dish, the first sauce you marinate the meat in. For the first sauce you need, 1 tablespoon of soy sauce, 1 tablespoon of oil, 3 tablespoons of water, 1/4 teaspoon of baking soda and 2 tablespoons of cornstarch, salt and pepper.


In a large freezer bag, combine all these ingredients. 


Thinly slice the beef and put the slices into the bag and let it marinate for an hour or up to 24 hours.


I bought a stir fry mix bag of vegetables at the store, but you can use whatever vegetables you prefer. 
To make the second sauce, in a small bowl add 3 tablespoons of chicken stock, 1 tablespoon of soy sauce, 1 tablespoon of oyster sauce and 1 teaspoon of sugar.


In your wok, preheat some oil and add the sliced beef, and cook it for about 1 minute.


 Remove it from the wok, but keep it warm as you set it aside. Now you will cook the vegetables. In the same wok, add 2 tablespoons of oil, then add 1/2 teaspoon of garlic and finally the stir fry vegetables. 


Cook them for about 1-2 minutes then add the meat back into the wok. 


Add the second sauce you made to the wok and cook the meat all the way, then serve the oyster sauce beef and vegetable over a bowl of rice!


Now for the second recipe! Chocolate covered cheesecake bites.
For this recipe you need 1 1/2 cup graham cracker crumbs, 1/2 cup chopped pecans, 1/4 cup melted butter, 2 packages (8oz. each) of cream cheese, 1/2 cup sugar, 1/4 cup sour cream, 2 eggs, 1/2 teaspoon of vanilla extract, 24 ounces of semisweet chocolate, 3 tablespoons of shortening.


Preheat the oven to 325 degrees.  Then you will make the crust. Get a 9X9 pan, line it with foil, and grease the foil. In a small bowl, combine the graham cracker crumbs, chopped pecans and melted butter. I had to grind my graham crackers prior into crumbs.


Press the combined graham cracker crumbs, pecans and butter into the bottom of the square pan and set it aside.


In your mixing bowl, beat the cream cheese, sugar and sour cream together until smooth. 


Crack the eggs and add them into the cream cheese mixture, and the vanilla extract. Pour this over the crust and bake it for 35-40 minutes or until the center is set. Cool the cheesecake, refrigerate it until it is chilled, then freeze the cheesecake overnight. Take the cheesecake out of the pan, cut it into square. Prepare the chocolate in a microwave safe bowl, and melt the chocolate. Then dip the cheesecake squares a few at a time. Keep the remaining cheesecake squares in the freezer until you are ready to use them. Keep the dipped cheesecake squares in the refrigerator until ready to serve.


Hope you all enjoy the treats, just eat, smile and enjoy!

I shutter what to think... Oh Pinteresting Wednesday

*Be sure to enter my giveaway for Stesha's set of 3 cards that feature her lovely photography! Go here to enter!
I am obsessed with farm chic decorations lately and that obsession has led me to consider doing a project with a window shutter. Craigslist has been my source of shopping for these shutters and I have had success. I haven't bought one yet but I fully intend to and recreate one of these adorable projects I pinned recently and added here for your viewing pleasure. What shutter project should I make? Help me out!
I'm linking this up over at The Vintage Apple


google


Source: robomargo.com via Meg on Pinterest


Source: google.com via Meg on Pinterest


Source: google.com via Meg on Pinterest


Source: google.com via Meg on Pinterest


Source: google.com via Meg on Pinterest


Fun T-shirt Project

It is Tuesday and I think it is time for another DIY project. This one is super fun and very easy to personalize it to fit your desires and favorite color. You start with a white t-shirt, how more of a blank canvas is that!
I did this fun and easy project over the weekend again with the Rit dye, ok I think I might have a slight obsession and start dying everything in sight including my dogs, kidding! I'm not a crazy dog owner like that but seriously I love dying lately. 
For this project you need a white shirt, Elmers gel glue, a print you will trace over and 
whatever color dye you will use. 


I did two actually and will show you both. I saw this project over at Life of Charmings so this is not my project nor will I pretend to take credit for it.
The first step is to wet the t-shirt, then wring it out so it isn't sopping wet. Then slip the design you picked under the front of the shirt, I wrapped up my design in cling wrap, a freezer bag will actually work better but I didn't have any at the time. I slipped a cookie sheet as well so the front of the shirt won't stick to the back. 


Then use the gel glue and trace over the design. Let the glue dry all the way, I wait about 24 hours. When it was dry, I prepared the dye according to the directions, set the shirt in and waited for the color I wanted. 


The deeper the color you want, the longer you leave the shirt in :-)

When you reach the color you want, wash the dye out first starting with warm water then gradually moving to cold water. Once the water runs clear, all the dye is out, then wash the shirt to remove any glue bits, let the shirt dry then wear it! 


How fun and easy is that, I think it would be especially cute for a Halloween shirt or a fun Christmas pattern!
This is is the second shirt I did as well.


Hope you all enjoy and don't forget to enter my giveaway for a set of cards from the beautiful Stesha of Classic and Bubbly!